
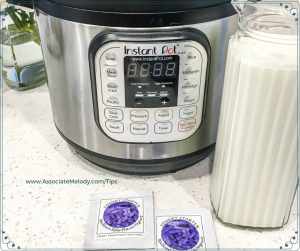
Easy Homemade Greek Yogurt


My daughter is the yogurt expert in the family. She makes the best greek style yogurt in her Instant Pot® brand pressure cooker. It’s thick, creamy and delicious. We gobble it up plain or served with fruit. It’s our grandson’s favorite breakfast. She likes making her own yogurt so she knows exactly what they’re eating. Many store-bought yogurts are sugar-overdosed and have other ingredients You might be wondering how do you make yogurt in an Instant Pot? Below you’ll find step by step directions with photos on how to make homemade yogurt in an Instant Pot.
You’ll find a printable version of the recipe at the bottom of this page. I’ve also included some tips to help you get the best results.
Easy Homemade Greek Yogurt Made in an Instant Pot

Homemade Greek Yogurt Ingredients:
- ½ gallon whole milk
- 2 packets of yogurt starter (or 2 tablespoons of plain, unsweetened yogurt with active cultures)
- Optional, vanilla extract or other flavor and honey.
Homemade Greek Yogurt Directions:
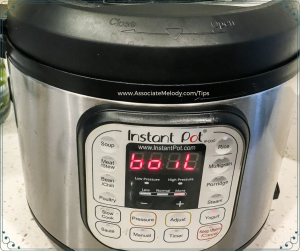
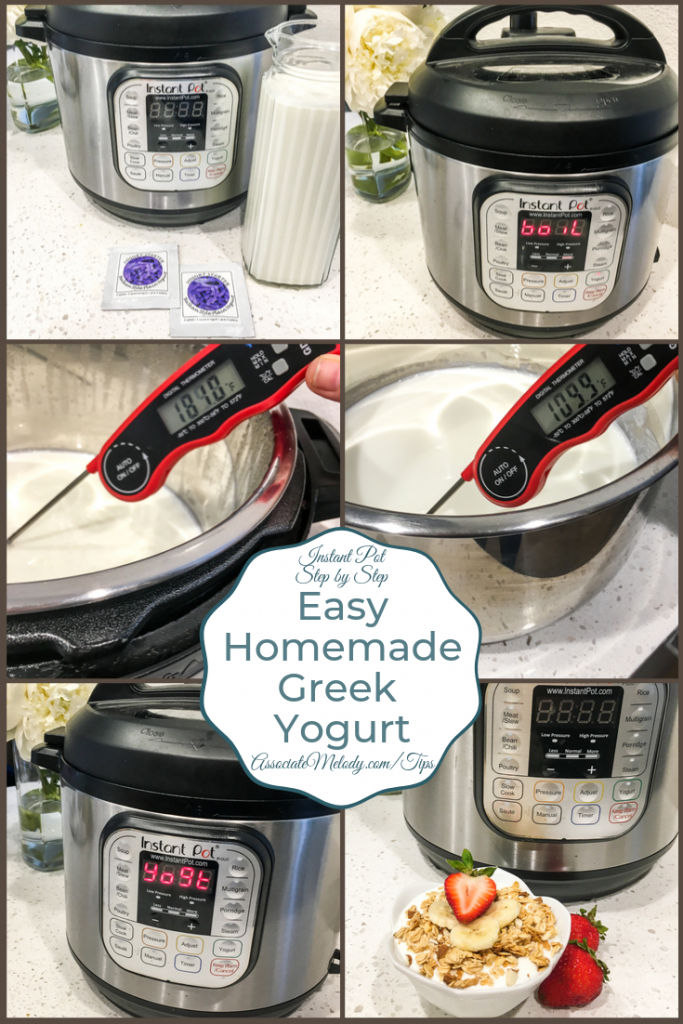
Step 1: Pour milk into the Instant Pot® inner pot, set pot inside the unit. Then select the ‘Yogurt’ function. Select ‘Adjust’ until the screen says ‘boiL.’ (see image)
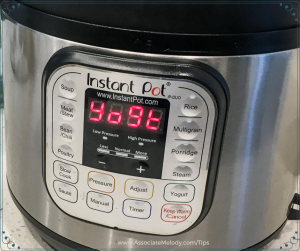
Step 2: Lock on the lid and turn the pressure knob to sealing. Now, wait until the unit beeps to indicate it is finished boiling. The screen will say “YoGt” when done. (see image)
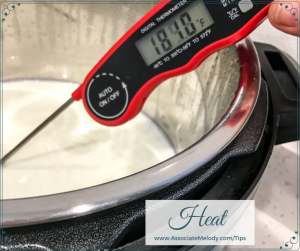
Step 3: Insert the instant-read thermometer into the milk to ensure it has reached at least 180°F (see image). If the milk hasn’t reached temperature repeat steps one and two.
Step 4: Turn the unit off and remove the inner pot to allow the milk to cool. For quicker results, place the pot in a tub of cold water or leave on the counter to cool naturally. Stir occasionally to help cool the milk evenly.
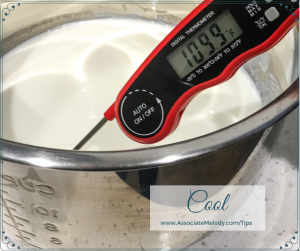
Step 5: When the instant-read thermometer reads 110°F, the milk is cool enough to add the yogurt starter. For best results, remove about a cup of the milk from the pot and stir the starter into that before pouring it into the rest of milk in the pot.
Step 6: Return the inner pot to the unit and cover with the lid. There’s no need to seal for this function. Select the ‘Yogurt’ function again and make sure the setting is on “Normal’ (NOT “Low” – very important!) and adjust the time for 8-10 hours. The longer the incubation period, the tangier the yogurt will be.
Step 7: When the yogurt is done incubating, remove the lid and turn unit off.
Step 8A: If you want regular yogurt simply transfer the yogurt to a resealable storage container and store it in the fridge. We like using glass mason jars.
Step 8B: If you want greek style yogurt you need to strain out some of the whey. Here’s how to strain yogurt. Line a strainer or colander with some cheesecloth and place it over a large bowl. Pour the yogurt into the strainer and place everything in the refrigerator to strain for several hours to overnight. The longer the yogurt is allowed to strain, the thicker the yogurt will be.
Step 9: Once the yogurt is strained transfer it to a bowl or resealable storage container. If you wish to flavor and sweeten your yogurt stir in a teaspoon of vanilla and a few tablespoons of honey. Sometimes we leave some plain for savory dishes. Store yogurt in an airtight container in the refrigerator for a week to 10 days. Save the liquid whey to use in smoothies, pancakes, bread or other baked goods.
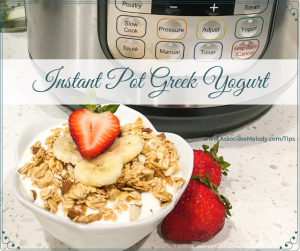
Eat plain or serve topped with fresh or cooked fruit, or berries, and/or granola.
Prep time: 5 minutes
Active cook time: 45-55 minutes
Incubation time: 8-10 hours
Serves: 4-6
Notes: A six-quart Instant Pot Duo was used for this recipe. The recipe can be doubled if desired.
Homemade Yogurt Tips
- If the yogurt texture is lumpy, process with an immersion blender or hand mixer until it’s creamy and smooth.
- Is yogurt too thick? Mix in some of the whey until the yogurt is the consistency you like.
- Yogurt cheese a healthy substitute for cream cheese, strain the yogurt until it as thick as cream cheese. Yogurt cheese is great for dips and spreads!
- Is yogurt too tangy or not tangy enough? Next time reduce or increase the incubation time to suit your taste.
- Yogurt is still runny like milk? The temperature of the milk is important. If it’s too hot when the starter is added it will kill the cultures.
- Freeze the whey or a bit of the yogurt before straining in ice cube tray to use as the starter for your next batch.
- Whole milk makes thicker yogurt than 1%, 2% or skim milk.
If you want a change of taste you can add different extracts, besides vanilla try almond, caramel, cherry, coconut, lemon, lime, orange, pumpkin spice, maple, raspberry, or strawberry. There’s also cocoa, coffee, and rum extracts for the grown-ups. I use and recommend Watkins extracts and flavorings, you can order them here. I’m also an Independent Watkins Consultant but I would still recommend them because I was a customer first and love the quality.

Ingredients
- ½ gallon whole milk
- 2 packets of yogurt starter (or 2 tablespoons of plain, unsweetened yogurt with active cultures)
Directions
- Add milk to Instant Pot® inner pot and select the ‘Yogurt’ function. Select ‘Adjust’ until the screen says ‘boiL.”
- Add lid and wait until the unit beeps to indicate it is finished boiling. The screen will say “YoGt” when done.
- Insert an instant-read thermometer into the milk to ensure it has reached at least 180°F
- Turn unit off and remove the pot to allow milk to cool. For quicker results, place the pot in a tub of cold water or leave on the counter to cool naturally.
- When the instant-read thermometer reads 110°F, the milk is cool enough to add the yogurt starter. For best results, remove about a cup of the milk from the pot and stir the starter into that before pouring it into the rest of milk in the pot.
- Return the inner pot to the unit and cover with the lid (no need to seal for this function). Select the ‘Yogurt’ function again and make sure the setting is on “Normal’ (NOT “Low” – very important!) and adjust the time for 8-10 hours. The longer the incubation period, the tangier the yogurt will be.
- When the yogurt is done incubating, remove the lid and turn unit off.
- If you want regular yogurt simply transfer the yogurt to a resealable storage container and store it in the fridge. We like using quart mason jars.
- If you want greek style yogurt you need to strain out some of the whey. Here's how to strain yogurt. Line a strainer or colander with some cheesecloth and place it over a large bowl. Pour the yogurt into the strainer and place everything in the refrigerator to strain for several hours to overnight. The longer the yogurt is allowed to strain, the thicker the yogurt will be.
- Once the yogurt is strained transfer it to a bowl or resealable storage container. If you wish to flavor and sweeten your yogurt stir in a teaspoon of vanilla and a few tablespoons of honey. Sometimes we leave some plain for savory dishes.
- Store yogurt in an airtight container in the refrigerator for a week to 10 days. Save the liquid whey and store in the fridge to use in smoothies, pancakes, bread or other baked goods.
About the Author
Melody is passionate about helping and empowering people. She blogs about natural living, real food, homemaking, direct sales, and life. People are the most important things, especially family. Last but not least, she loves being an Independent Watkins Consultant.


No Comments Yet.